มาทำ Radio Interface – Hotspot ด้วย Module SA818S

หลังจากที่เรารู้จัก Radio POC และ IPPTT – Web Management บทความที่ผ่านมา ไปเรียบร้อยแล้ว ซึ่งทำงานผ่าน Internet หรือ Voice over IP หลาย ๆ ท่านคงจะอยาก จะเอาตัววิทยุ RF (เช่น วอแดง วอดำ ย่านความถี่ VHF, UHF) เข้ามาทำงานร่วมกันกับ Radio POC

วันนี้ Admin จะมาแนะนำ การทำ Radio Interface – Hotspot ด้วย SA818S

ซึ่ง ตัว Module SA818S สามารถทำงานได้ทั้ง 2 ย่านความถี่ คือ VHF (134 ~ 174MHz) และ UHF (400 ~ 480 MHz) มีกำลังส่งอยู่ที่ 0.5 W ซึ่งเป็นตัวรับส่งวิทยุขนาดเล็ก

Board PCB Interface Radio SA818S 

อุปกรณ์ที่จะใช้บัดกรี บนบอร์ด PCB

Designator Name Quantity
SA818S 1
R1 Resistor 1K 1
R2 Resistor 10K 1
R3 Resistor 2k2 1
R4 Resistor 1K 1
R5 Resistor 10K 1
R6 Resistor 47K 1
R7 Resistor 68K 1
R9 Resistor 1K 1
C1 Capacitor 470nF 1
C2 Capacitor 470nF 1
C3 Capacitor 1nF 1
T1 Transistor BC547 1
T2 Transistor BC547 1
U6 SMA connector (For antena) 1
Connector 13 Pin header Female  3

Let’s Go! เมื่ออุปกรณ์ครบแล้วเราก็เริ่ม ประกอบวงจรกันเลยครับ

ขั้นตอนการตั้งค่า Talkkonnect บน Orange Pi Zero LTS และตั้งค่า Interface Radio SA818S

1.  เข้าไปที่ SSH Orange Pi zero LTS

2. พิมพ์ git clone https://github.com/talkkonnect/talkkonnect.git

cd talkkonnect/script/


3. chmod 777 tkbuild-orangepi-32bit.sh

4.  ./tkbuild-orangepi-32bit.sh

5.  จากนั้นรอจน talkkonnect ติดตั้งเสร็จเรียบร้อย

6.  เข้าไปที่ cd talkkonnect/sample-configs/

cp talkkonnect-version2-usb-gpio-example.xml  /home/talkkonnect/gocode/src/github.com/talkkonnect/talkkonnect/ talkkonnect.xml


7. nano /etc/systemd/system/talkkonnect.service

[Unit]

Description=TalKKonnect Radio Screen

Requires=systemd-user-sessions.service network.target sound.target dbus.socket

After=multi-user.target

AllowIsolate=true

[Service]

RemainAfterExit=no

User=

Group=

Type=forking

WorkingDirectory=

ExecStartPre=

ExecStart=/usr/bin/screen -dmS tk /home/talkkonnect/bin/talkkonnect

ExecReload=/bin/kill -s HUP $MAINPID

ExecStop=/bin/kill -s SIGTERM $MAINPID

PrivateTmp=true

Restart=always

RestartSec=10

[Install]

WantedBy=multi-user.target

Alias=talkkonnect.target


8. ทำการ restart service

systemctl enable talkkonnect.service

systemctl start talkkonnect.service

systemctl status talkkonnect.service


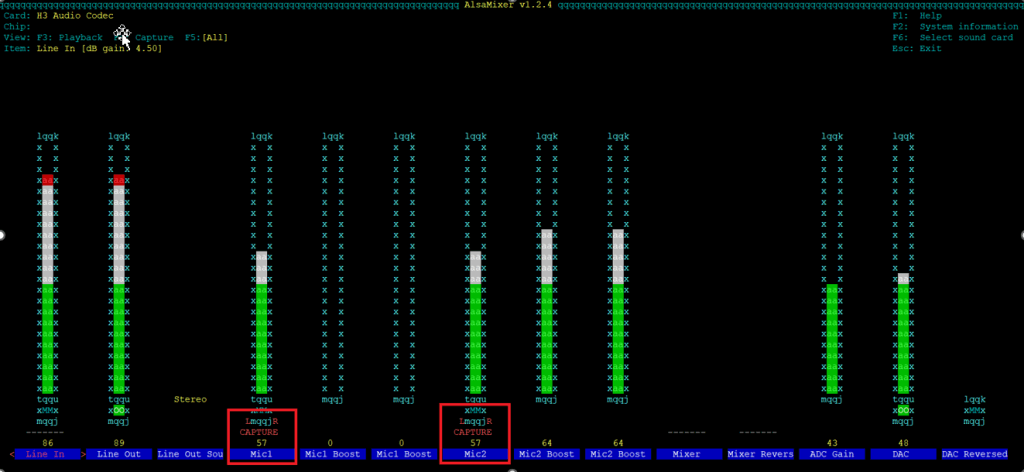
9. ทำการ Enable Sound card

*** check sound enable

lsmod|grep snd

—–

armbian-config ==> system ==> hardware  ==> 

analog-codec, uart2 

you should see – after a reboot


10. ตรวจสอบการทำงาน Talkkonnect ด้วยคำสั่ง

 screen -r -dmS tk /home/talkkonnect/bin/talkkonnect


11. ทำการปรับแต่งการตั้งค่า sound card ใช้คำสั่ง  alsamixer

เพื่อปรับลดความดังของ Line audio และ MIC1

ซึ่งการตั้งค่า MIC1 ให้เลือกที่ MIC1 และทำการกด space key ให้ขึ้นคำว่า CAPTURE ดังรูป

12. ทำการตั้งค่าให้ alsamixer save ค่าที่เรากำหนดไว้

ใช้คำสั่ง

sudo alsamixer

sudo alsactl –file ~/.config/asound.state store

sudo nano ~/.bashrc

alsactl –file ~/.config/asound.state restore

เสร็จแล้ว reboot 

13. สำหรับ Configuration GPIO PIN เปิดใช้งานเฉพาะ pin 7 และ pin 10 ที่เหลือตั้งค่าเป็น enable=”false”

<hardware targetboard=”rpi”>

          <pin direction=”output” device=”led/relay” name=”voiceactivity” pinno=”7″ type=”gpio” chipid=”0″ inverted=”false” enabled=”true”/>

           <pin direction=”input” device=”pushbutton” name=”txptt” pinno=”10″ type=”gpio” chipid=”0″ enabled=”true”/>

14. สำหรับ Configuration XML ของ Radio

ให้เปิดใช้งาน ฟังก์ชั่น Radio

<radio enabled=”true”>

        <connectchannelid>01</connectchannelid>

        <sa818 enabled=”true”>

          <serial enabled=”true”>

            <port>/dev/ttyS2</port>

            <baud>9600</baud>

            <stopbits>1</stopbits>

            <databits>8</databits>

          </serial>

          <channels>

            <channel id=”01″ name=”ham-2ml” enabled=”true”>

              <bandwidth>0</bandwidth>

              <rxfreq>151.0500</rxfreq>

              <txfreq>151.0500</txfreq>

              <squelch>5</squelch>

              <ctcsstone>0</ctcsstone>

              <dcstone>0</dcstone>

              <predeemph>0</predeemph>

              <highpass>0</highpass>

              <lowpass>0</lowpass>

              <volume>8</volume>

            </channel>

          </channels>

        </sa818>

   </radio>

15. ทดสอบใช้งานร่วมกับ วิทยุ Handy Radio

ขั้นตอนการตั้งค่า hotspot radio gateway ผ่าน IPPTT-Platform

Video ทดสอบ Radio POC talkkonnect กับ วิทยุ VHF + Hotspot radio interface

Written by admin

Leave a Reply

Your email address will not be published. Required fields are marked *